
Easy Strawberry Pie Recipe
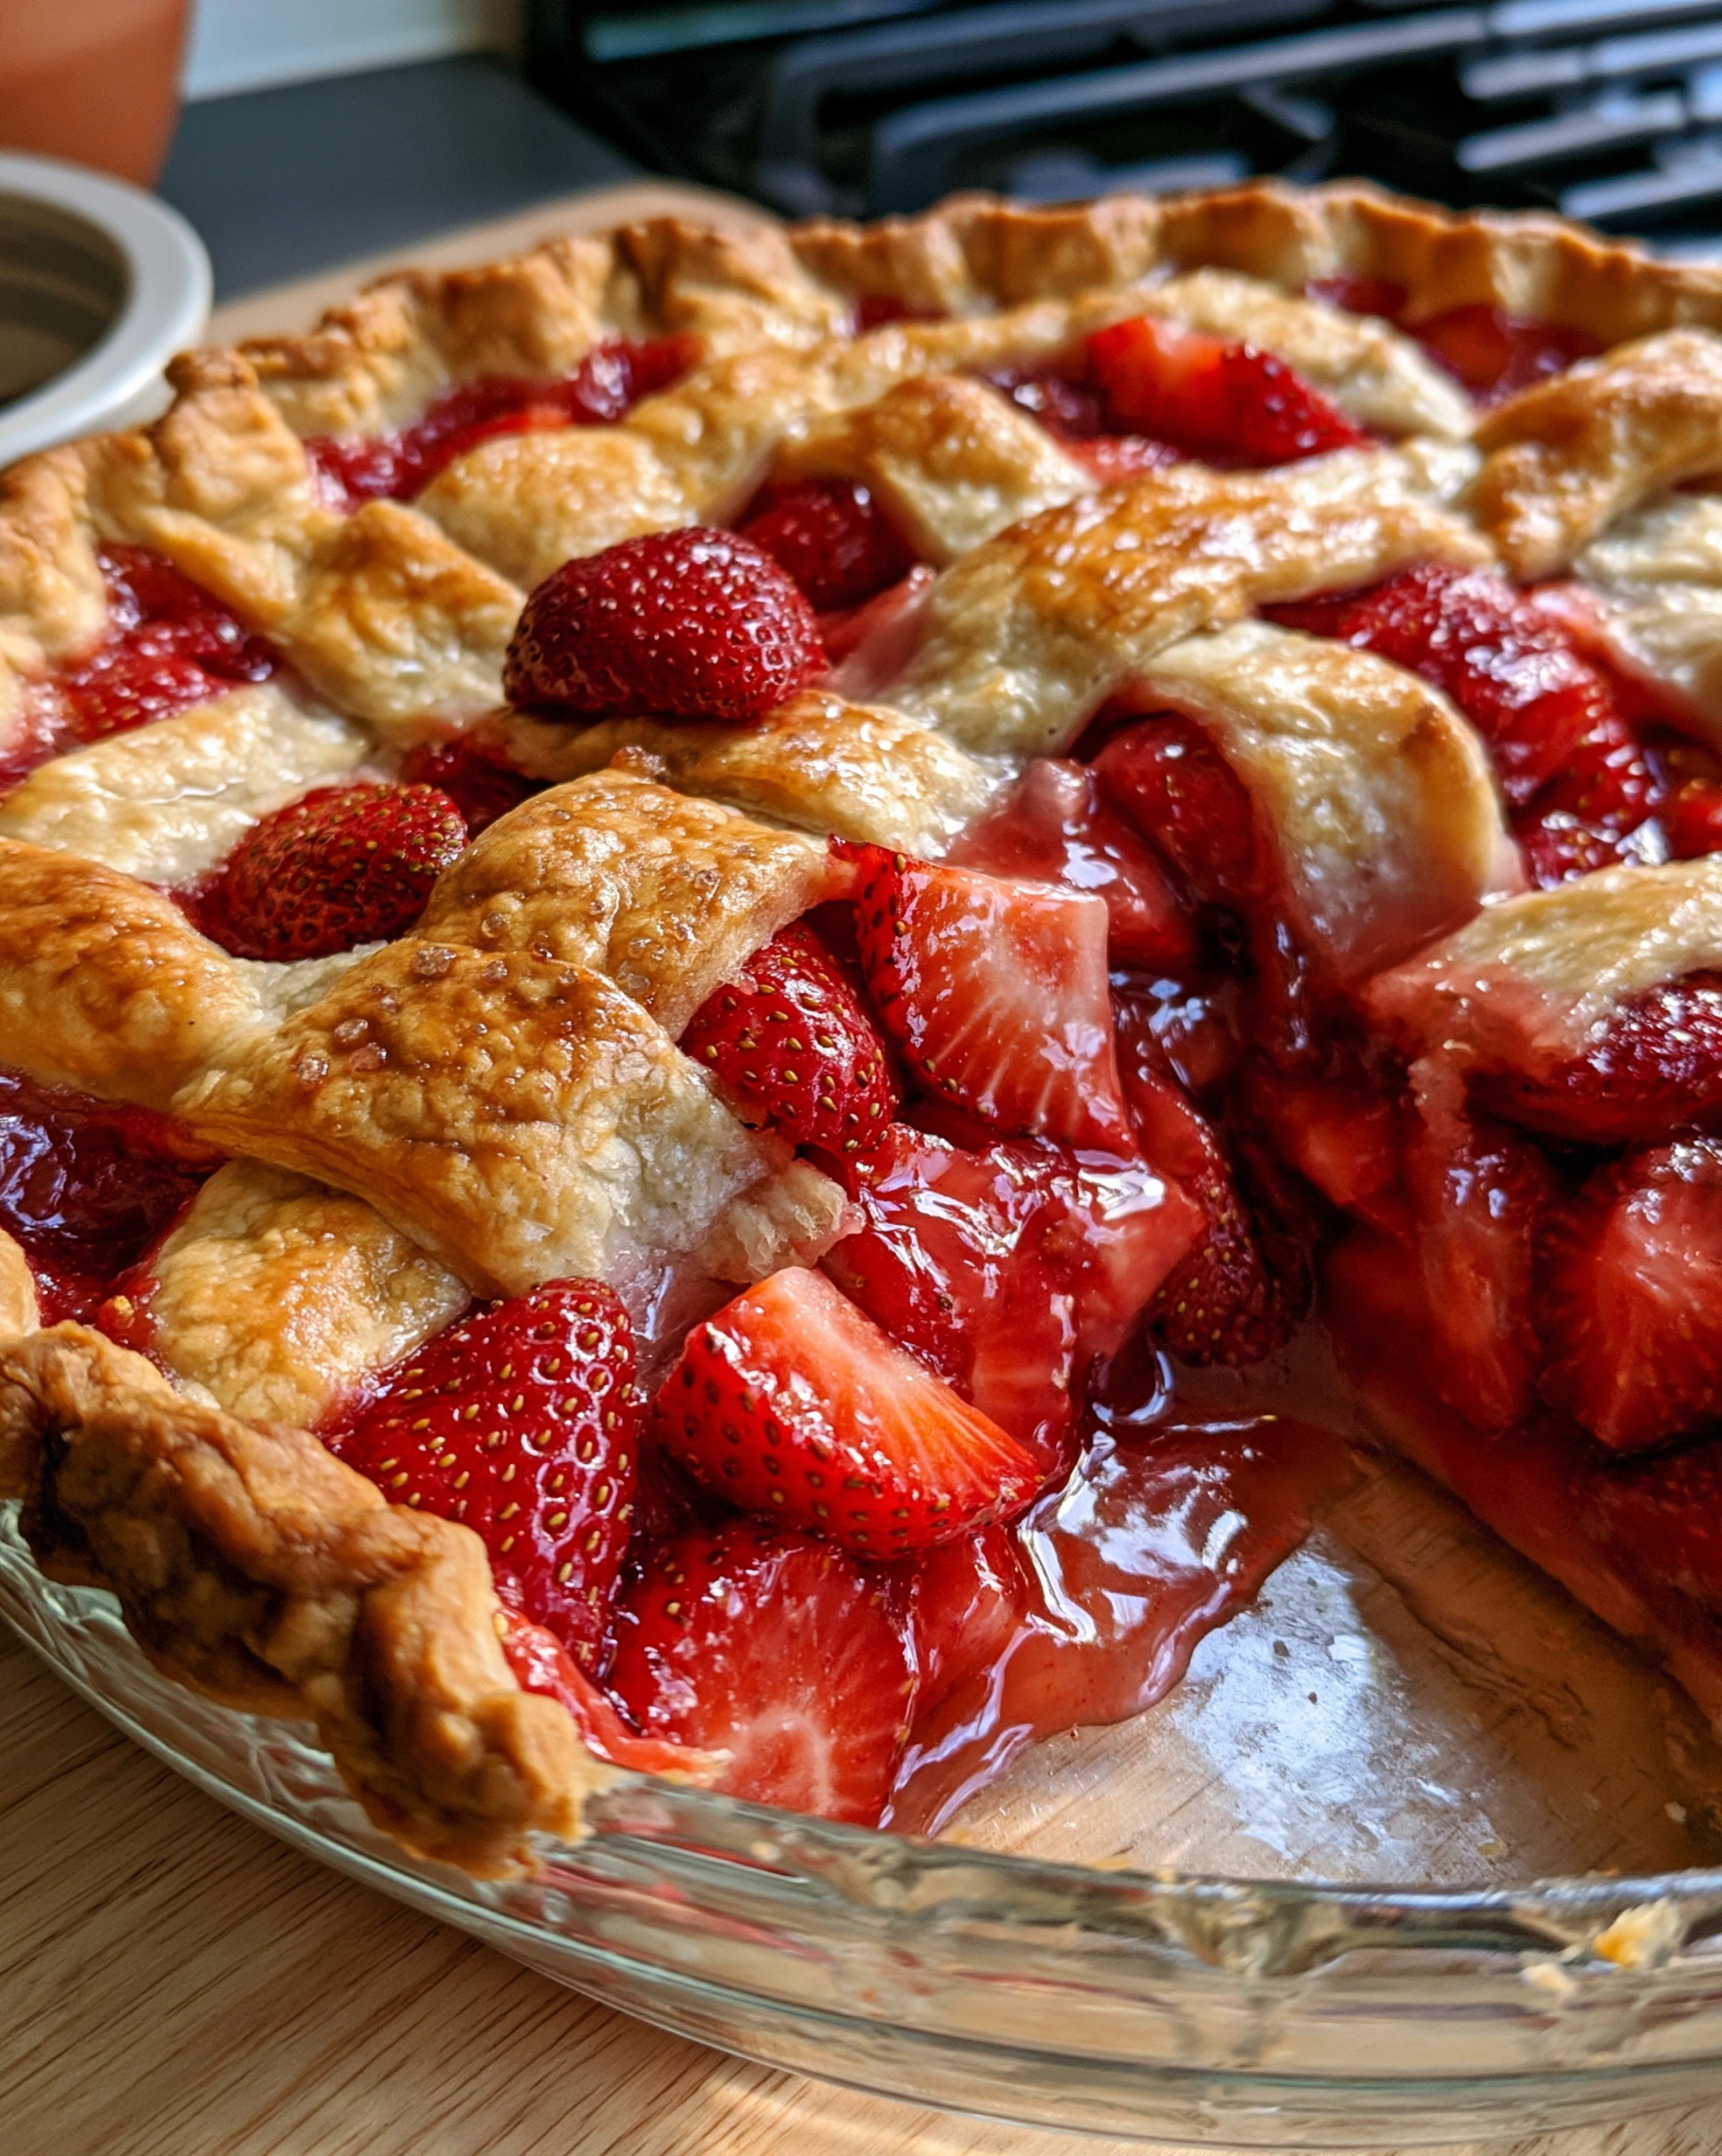
Let us be clear about what kind of strawberry pie this is, because the photo already told you: this strawberry pie is baked. Not the no-bake kind with berries set in jelly — a real, old-fashioned, oven-baked pie, with a golden woven lattice on top and a filling of chunky fresh strawberries that bake down into the glossiest, jammiest, brightest-red filling you have ever spooned out of a crust. Look at the cut edge in the photo: big pieces of berry, shiny juices, flaky pastry. That is what is coming out of your oven.
The other thing the photo tells you is that this pie is not shy. It is piled high with fruit — about two pounds of berries, hulled and cut into big halves and chunks so they stay distinct instead of melting into sauce. A little lemon and vanilla keep the flavor pure strawberry, the lattice lets the steam escape and the top go crisp and sugar-sparkled, and a proper cool at the end gives you slices that hold together while the filling stays soft and glossy.
Why Baked Strawberry Pie Beats the Gelatin Kind
- Real pie, real crust — top and bottom pastry baked golden and flaky around the fruit, instead of berries suspended in jelly on a pre-baked shell.
- Chunky berries, not berry mush — the strawberries go in as big halves and pieces and come out tender but distinct, just like the cut slice in the photo.
- Glossy, jammy filling — cornstarch with a touch of flour sets the juices into a shiny sauce that coats the fruit and still looks juicy, never stiff or cloudy.
- Pure strawberry flavor — no gelatin, no boxed mix, nothing artificial. Just berries, sugar, lemon and vanilla doing their thing.
- That lattice moment — woven golden strips with a sparkle of coarse sugar over ruby-red fruit is the most beautiful thing a summer table can hold.
The Ingredients (Two Pounds of Berries and Not Much Else)
- 1 package refrigerated pie crusts (2 crusts), or your favorite homemade double crust — one lines the dish, one becomes the lattice. Let refrigerated crusts rest at room temperature about 15 minutes before unrolling.
- 5 cups fresh strawberries (about 2 pounds / 900 g), hulled and halved — big berries get quartered, small ones can stay whole. The pieces should be chunky, like the photo — thin slices cook down to sauce and you lose that beautiful cut face.
- 3/4 cup granulated sugar — ripe in-season berries are sweet on their own; early or tart berries can take up to 1 cup. Taste a berry before you decide.
- 1/4 cup cornstarch plus 2 tablespoons all-purpose flour — the team that thickens the juices. Cornstarch gives the glossy shine, flour keeps the set soft and spoonable instead of jelly-firm.
- 1 tablespoon fresh lemon juice — keeps the berry flavor bright and the color a true, vivid red.
- 1 teaspoon vanilla extract — rounds out the fruit and makes the whole pie smell like a bakery.
- 1/4 teaspoon fine salt — a small amount that makes the strawberry flavor taste more like itself.
- 1 tablespoon unsalted butter, cut into tiny cubes — dotted over the filling for a little richness and shine.
- 1 large egg beaten with 1 tablespoon water — egg wash for that deep golden, glossy lattice.
- 1 tablespoon coarse sugar, for sprinkling — the sparkle on the crust in the photo. Demerara, turbinado, or plain granulated all work.
How to Make It: Chop Big, Weave, Bake, Cool
- Heat the oven and the pan. Set a rack in the lower third of the oven, put a rimmed baking sheet on it, and preheat to 400°F (200°C). Baking the pie on a hot sheet crisps the bottom crust and catches the inevitable ruby drips.
- Line the dish. Ease one crust into a 9-inch pie dish — glass, like the photo, lets you watch the bottom crust turn golden. Press gently into the corners, leave the overhang, and chill the lined dish while you work on the fruit.
- Mix the filling. In a large bowl, combine the strawberries, sugar, cornstarch, flour, lemon juice, vanilla and salt. Fold gently with a spatula until the berries are evenly coated and the dry ingredients disappear into the juices. Let it rest 10 to 15 minutes — the sugar will start drawing out juice and the thickeners will dissolve.
- Fill generously. Spoon the berries and every drop of their juice into the chilled crust, mounding them slightly in the center (they settle as they bake). Dot the butter cubes over the top.
- Cut the lattice. Roll the second crust out on a lightly floured surface and cut 10 strips about 1 inch (2.5 cm) wide with a knife or fluted pastry wheel.
- Weave the top. Lay 5 strips across the filling, then weave the remaining 5 over and under at right angles. The berries will peek through the gaps in juicy red squares — that is the look you want, same as the photo.
- Seal, crimp, wash, sparkle. Trim the strips and overhang to about 1/2 inch past the rim, fold everything under, and crimp the edge with your fingers or a fork. Brush the lattice and edge with egg wash (keep it off the exposed filling) and sprinkle the coarse sugar over the pastry.
- Bake. Place the pie on the hot baking sheet. Bake at 400°F (200°C) for 20 minutes, then reduce the heat to 350°F (175°C) and bake 40 to 45 minutes more, until the crust is a deep golden brown and the filling is bubbling thickly and slowly in the center. If the edge races ahead, cover it loosely with foil for the last stretch.
- Cool — completely. Move the pie to a rack and cool for at least 3 to 4 hours. This is when the glossy filling sets into its final, sliceable-but-juicy texture. Warm pie is delicious chaos; cooled pie is clean slices with that shiny cut face from the photo. Choose your adventure, but know what you are choosing.
Sofia’s Expert Tips (Bright Red, Never Watery)
- Cut the berries big. Halves and quarters, not slices. Big pieces hold their shape through an hour in the oven, keeping the filling chunky instead of soupy — and a thick slice of baked strawberry in the finished wedge is the whole reward.
- Watch the center bubbles, not the clock. Strawberry juices must reach a real bubble in the middle of the pie for the cornstarch to activate. Lazy, thick, slow bubbles in the center — not just fizzing at the edges — mean the filling will set glossy instead of running.
- Taste your berries first. Strawberries vary wildly. Sweet, deep-red, in-season fruit needs only 3/4 cup of sugar; pale or tart fruit needs the full cup and earns it. One berry, one decision, better pie.
- Dry berries make better filling. After hulling and halving, spread the berries on a clean towel for a few minutes if they are wet from washing. Surface water dilutes the thickener before the pie even reaches the oven.
- Glass dish, honest view. A clear glass dish like the one in the photo is not just pretty — it is a tool. You can lift the pie and check the bottom crust: golden means crisp and done, pale and translucent means give it 10 more minutes.
- Rest the filling before it goes in. Those 10 to 15 minutes of macerating are not optional pacing — they dissolve the cornstarch into the juices so it thickens evenly in the oven instead of leaving white streaks or a chalky bite.
Easy Variations Worth Trying
- Strawberry rhubarb lattice: replace 2 cups of the strawberries with diced rhubarb and raise the sugar to 1 full cup. The classic sweet-tart pairing, and the lattice shows off both colors.
- Strawberry crumble top: skip the lattice and blanket the filling with crumble — 3/4 cup flour, 1/2 cup brown sugar, 1/2 cup rolled oats, 6 tablespoons melted butter. Same bake, crunchy rustic finish.
- Mixed berry summer pie: use 3 cups strawberries plus 2 cups blueberries or raspberries. Keep the thickeners exactly the same and bake until the center bubbles.
- Handheld mini pies: cut the crusts into rounds, fill, fold, crimp with a fork, egg wash and bake at 400°F (200°C) for 20 to 25 minutes. Portable slices of summer for picnics and lunchboxes.
How to Store, Freeze and Reheat It
- Room temperature: covered loosely, the baked pie keeps beautifully for up to 2 days. The crust stays at its flakiest and the filling keeps its glossy set.
- Fridge: after day two, refrigerate for up to 3 more days. Cold slices are firm and jammy — honestly wonderful straight from the fridge with a fork, standing at the counter.
- Warm it back up: reheat slices in a 350°F (175°C) oven for about 10 minutes to revive the crust. A scoop of vanilla ice cream or a cloud of whipped cream over a warm slice is the classic serving, and classics are classic for a reason.
- Freezer: this pie freezes better unbaked. Assemble it completely (egg wash and all), freeze solid, wrap tightly, and keep up to 3 months. Bake from frozen at 400°F (200°C) for 25 minutes, then 350°F (175°C) for 50 to 60 minutes, until the center bubbles.
FAQs
Both styles exist, and they are different desserts. The no-bake kind sets fresh berries in a gelatin glaze over a baked shell. This recipe is the baked kind — a true double-crust pie where the fruit cooks under a lattice until it turns jammy and glossy, like the pie in the photo. If you want flaky pastry wrapped around warm, cooked-down berries, baked is your pie.
The three usual reasons: the filling never reached a full, thick bubble in the center (so the cornstarch never fully activated), the pie was sliced before its 3 to 4 hour cool, or the berries were very wet going in. Bake to center bubbles, cool with patience, and pat washed berries dry — runny strawberry pie is almost always one of those three.
Fresh is strongly preferred here because frozen berries release a lot of extra juice and break down into a softer, sauce-like filling — you will lose the chunky pieces that make this pie special. In a pinch, thaw frozen berries completely, drain off the juice, and add 1 extra tablespoon of cornstarch. The flavor will still be good; the texture will be softer.
Chill is the answer at every stage: a cold lined dish, a filling that goes in cool, and 15 minutes in the fridge for the assembled pie if your kitchen is warm. Also let the rolled crust rest a few minutes before cutting strips — dough that was just rolled pulls back, while rested dough keeps its length. And avoid stretching strips as you lay them; lay, never pull.
Vanilla ice cream is the classic for a reason — it melts into the warm, glossy filling. Lightly sweetened whipped cream is the lighter option and lets the berry flavor lead. For a breakfast-adjacent move nobody regrets, a cold slice with a spoonful of thick Greek yogurt is genuinely excellent.
Easy Strawberry Pie Recipe
Course: DessertCuisine: AmericanDifficulty: Easy8
servings30
minutes1
hour5
minutesAn old-fashioned baked strawberry pie with two pounds of fresh berries cut big, set into a glossy jammy filling under a wide golden lattice with a sugar sparkle. Pure strawberry flavor — no gelatin, no shortcuts.
Ingredients
1 package refrigerated pie crusts (2 crusts) or homemade double crust
5 cups fresh strawberries (about 2 lb/900 g), hulled and halved
¾ cup granulated sugar
¼ cup cornstarch plus 2 tbsp all-purpose flour
1 tbsp fresh lemon juice
1 tsp vanilla extract
¼ tsp fine salt
1 tbsp unsalted butter, cut into tiny cubes
1 large egg beaten with 1 tbsp water (egg wash)
1 tbsp coarse sugar, for sprinkling
Directions
- Rack in lower third; baking sheet on it; preheat 400°F (200°C).
- Line a 9-inch glass dish with one crust; chill.
- Fold berries with sugar, cornstarch, flour, lemon juice, vanilla and salt; rest 10–15 minutes.
- Fill the crust, mounding slightly; dot with butter.
- Cut second crust into 10 strips about 1 inch wide.
- Weave the lattice.
- Trim, fold under, crimp; egg wash; sprinkle coarse sugar.
- Bake 20 minutes at 400°F, then 40–45 minutes at 350°F (175°C) until deep golden and bubbling thickly in the center.
- Cool at least 3–4 hours before slicing.
Notes
- Cut the berries into halves and big chunks, never thin slices — the chunky pieces are the point. The filling must bubble thickly in the center before the pie comes out, and the pie needs its full 3 to 4 hour cool to slice with that glossy finish. Total time excludes 3 to 4 hours of cooling.
Save this recipe for the first weekend of strawberry season — one slice of this and the no-bake version will never quite do it again.
More recipes you’ll love: Blueberry Pie, Cherry Pie and Pie.


One Comment