Easy Apple Pie Filling Recipe
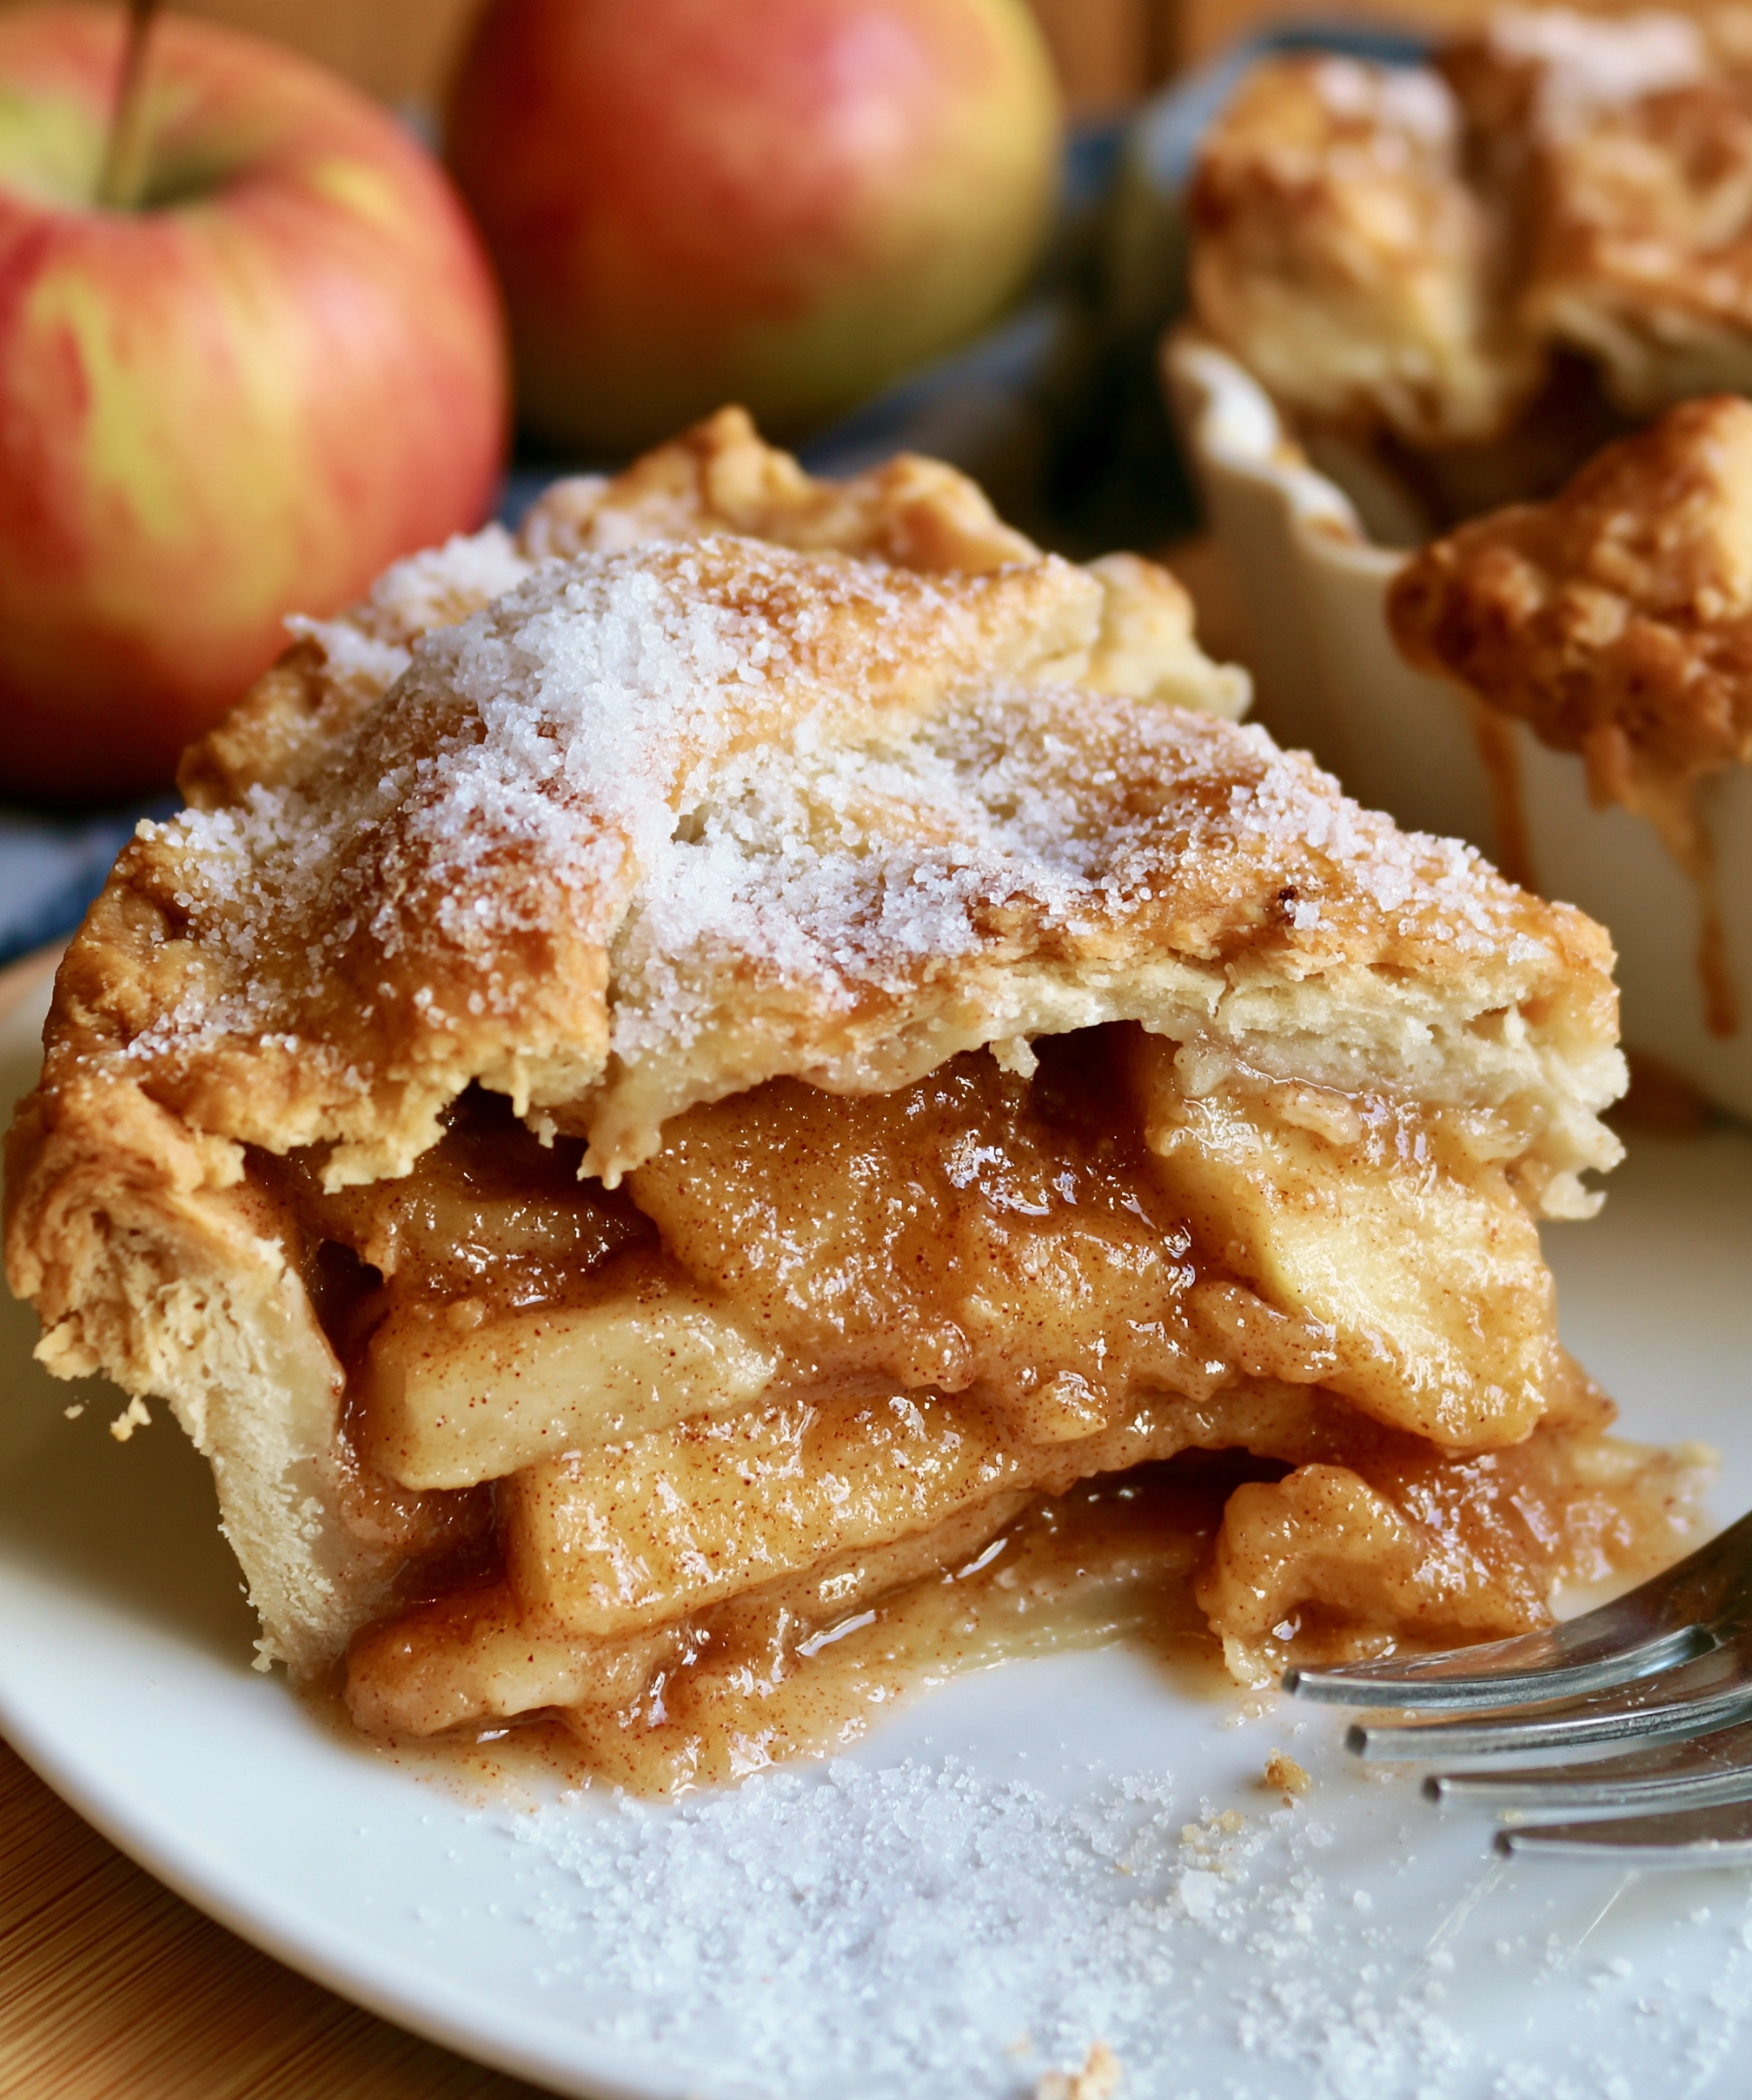
Canned apple pie filling has a lot to answer for: pale, gummy apples floating in a gluey sauce that tastes mostly of tin and cinnamon flavoring. This apple pie filling is the opposite of that can. Thin, even slices of real apples — half tart, half sweet — simmered on the stove with butter, brown sugar, and cinnamon until every slice is tender, glossy, and coated in a thick amber sauce. Fifteen minutes of cooking, and you get the exact filling in that slice in the photo: layered slices that hold their shape, a sauce that sets shiny instead of running, and flavor that actually tastes like apples.
The best part is that this apple pie filling is a building block, not just a pie ingredient. Make one batch and your week changes: it fills a 9-inch pie today, tops vanilla ice cream tonight, and waits in the freezer for the next crisp, turnover, or stack of pancakes. Once you have made it yourself, the can stays on the shelf forever.
Why Homemade Filling Beats the Can Every Single Time
- Real slices, not apple mush — cut an even 1/4 inch and cooked just until tender, the slices stay distinct and layered, like the cut slice in the photo, instead of dissolving into sauce.
- A sauce that sets glossy — cornstarch plus a proper cool gives you that thick, amber, sliceable set, so wedges come out clean instead of flooding the plate.
- You control the apples — a tart-and-sweet mix gives depth a single variety cannot. No bland, one-note filling.
- Thirty minutes, one pan — peel, slice, simmer, thicken. It is genuinely faster than a trip to the store for the canned stuff.
- Freezer-friendly gold — make a double batch in apple season and freeze it in pie-ready portions. Future you is already grateful.
The Ingredients (Short List, Big Difference)
- 6 medium apples (about 2 1/2 lbs / 1.1 kg), peeled, cored, and sliced 1/4 inch thick — about 6 cups of slices. Use a mix: 3 tart Granny Smith for structure and bite, 3 sweet Honeycrisp or Gala for flavor — those red-and-gold apples behind the pie in the photo. Firm apples are non-negotiable; soft, mealy ones cook down to applesauce.
- 1 tablespoon lemon juice — tossed over the slices the moment they are cut. It keeps them from browning and quietly brightens the whole batch.
- 4 tablespoons (55 g) unsalted butter — this is what makes the sauce rich and glossy instead of watery-sweet. Do not skip it.
- 1/2 cup (100 g) granulated sugar — clean sweetness that lets the apple flavor lead.
- 1/2 cup (110 g) packed light brown sugar — the molasses in brown sugar is responsible for the deep amber color of the sauce in the photo, and a gentle caramel note underneath the cinnamon.
- 1 1/2 teaspoons ground cinnamon — the warm flecks you can see throughout the filling. Use cinnamon you would happily smell straight from the jar; stale spice makes flat filling.
- 1/4 teaspoon ground nutmeg — just a background whisper that makes the filling taste like the holidays without announcing itself.
- 1/4 teaspoon fine salt — a small amount that sharpens every other flavor. Unsalted filling tastes oddly dull; this fixes it.
- 3/4 cup (180 ml) water or apple cider, divided — cider doubles down on apple flavor and is my first choice. You will use 1/2 cup in the pan and 1/4 cup for the slurry.
- 3 tablespoons cornstarch — the thickener. Whisked into cold liquid first (a slurry), it turns the juices into that shiny, gel-like sauce that holds a slice together.
- 1 teaspoon vanilla extract — stirred in off the heat at the very end, where it rounds everything out without cooking off.
How to Make It: Slice, Simmer, Thicken, Cool
- Peel, core, and slice evenly. Peel the apples, quarter and core them, then cut each quarter into slices a scant 1/4 inch thick — the flat, even slices stacked in the photo. Toss them in a large bowl with the lemon juice as you go so they stay pale. Even thickness matters more than speed here: slices that match cook at the same rate.
- Melt the butter and add the apples. In a large, deep skillet or Dutch oven, melt the butter over medium heat. Add all the apple slices, both sugars, the cinnamon, nutmeg, salt, and 1/2 cup of the water or cider. Toss gently with a big spoon or spatula until every slice is coated in the spiced sugar.
- Simmer until just tender. Cover the pan, drop the heat to medium-low, and cook for 8 to 10 minutes, stirring gently every few minutes so the slices cook evenly without breaking. The apples are ready when a fork slides into a slice with only slight resistance — tender at the edges, still holding their shape, glossy with released juice. Remember, they will cook again inside a pie, so pull them a shade before soft.
- Whisk the slurry. While the apples simmer, whisk the cornstarch with the remaining 1/4 cup of cold water or cider in a small bowl until completely smooth, with no white streaks or lumps. Cold liquid is the whole trick — cornstarch stirred straight into a hot pan clumps instantly.
- Thicken to glossy. Uncover the pan and pour the slurry over the apples in a slow stream, stirring gently and constantly. Cook 1 to 2 minutes more, until the sauce bubbles, turns clear and shiny, and coats the slices in a thick amber glaze — the gloss in the photo. It will look slightly looser than the final set; that is right, because it firms up as it cools.
- Finish with vanilla. Take the pan off the heat and stir in the vanilla extract. Taste a cooled spoonful and adjust: a pinch more cinnamon, a squeeze more lemon, a spoon more sugar for very tart apples. This is your last, best chance to balance it.
- Cool it completely. Scrape the filling into a shallow dish or rimmed baking sheet — spreading it out cools it fast — and let it come fully to room temperature, about 30 minutes, before using or storing. Warm filling poured into a raw crust melts the butter in the pastry and guarantees a soggy bottom; cooled filling keeps the bottom crisp and lets the sauce set into clean slices.
Sofia’s Expert Tips (Glossy Sauce, Tender Slices)
- The two-apple rule. All-tart filling puckers; all-sweet filling tastes flat and jammy. Half Granny Smith, half Honeycrisp (or Braeburn, or Pink Lady) gives you structure, brightness, and real apple depth in every bite. It is the single biggest upgrade over the canned version.
- Even slices are everything. A 1/4-inch slice is thin enough to go tender in 10 minutes and sturdy enough to stay a slice. Ragged, mixed thicknesses mean some slices mush while others stay crunchy. Take the extra two minutes with the knife; the layered look in the photo comes from exactly this.
- Stop at “just tender.” The filling cooks twice — once in your pan, once inside the pie. If the slices are fully soft on the stove, they will be sauce by the time the pie is sliced. Slight resistance now means perfect slices later.
- Never chase the final thickness on the stove. The sauce sets as it cools, the way gelatin does. On the heat you want thick and glossy, coating a spoon; in the fridge it will firm up another full step. Over-thicken it hot and the cooled filling turns stiff and gummy.
- Cool before the crust — always. I will say it twice because it ruins more pies than any other mistake: hot or even warm filling into raw pastry equals a pale, soggy bottom crust. Room temperature filling, cold crust, hot oven. That is the whole formula.
- Save the juice. If your apples gave off a lot of liquid and the sauce seems thin after thickening, do not panic and do not dump it — that juice is pure flavor. An extra teaspoon of slurry and one more minute of bubbling will bring it right back to glossy.
Easy Variations Worth Trying
- Caramel apple filling: use all brown sugar (1 cup total) and stir 2 tablespoons of caramel sauce in with the vanilla. The sauce turns deeper amber and tastes like a county-fair caramel apple in pie form.
- Apple cranberry: add 1 cup of fresh or frozen cranberries with the apples and an extra 2 tablespoons of sugar. The berries burst into tart, ruby pockets — this is my Thanksgiving version.
- Warm-spiced (apple pie spice) filling: swap the cinnamon and nutmeg for 2 teaspoons of apple pie spice and add a pinch of ground cloves or cardamom. Deeper, warmer, a little more old-fashioned.
- Spoonable skillet apples: cut the apples into chunks instead of slices and drop the cornstarch to 2 tablespoons. You get a looser, spoon-over-everything topping for ice cream, oatmeal, waffles, and pork chops.
How to Store, Freeze and Reheat It
- Fridge: transfer the completely cooled filling to an airtight container or jar and refrigerate for up to 4 days. The sauce will set firm in the cold — that is normal, and it loosens again as it comes back to room temperature.
- Freezer (the pie-ready trick): line a 9-inch pie plate with a large freezer bag or foil, fill it with cooled filling, and freeze solid. Pop the frozen disk out, seal it in a freezer bag, and store for up to 3 months. On pie day, the disk drops straight into your crust — thaw it in the fridge overnight first for the most even bake. Plain containers and flat freezer bags of filling also keep up to 3 months.
- Reheat gently: warm stored filling in a saucepan over low heat with a splash of water or cider, stirring until it relaxes back to glossy. Two or three minutes is plenty; you are loosening it, not cooking it again.
- A word on canning: this is a refrigerator-and-freezer filling, and that is deliberate. Cornstarch-based fillings are not recommended for home water-bath canning, because the thickener can interfere with safe heat penetration. If you want shelf-stable jars, use a tested canning recipe built on ClearJel — and freeze this batch in the meantime.
FAQs
Firm ones that hold their shape in heat. Granny Smith is the classic tart backbone; Honeycrisp, Braeburn, Pink Lady, and Jonagold bring sweetness and real apple flavor. My favorite batch is half tart, half sweet. Avoid Red Delicious and other soft, mealy apples — they collapse into grainy sauce no matter how carefully you cook them.
Runny usually means the slurry never truly bubbled: cornstarch only reaches full thickening power at a boil, so give it that full minute or two of bubbling. It also firms significantly as it cools, so judge it cold, not hot. If it is still loose when cold, simmer it with another teaspoon of slurry. Too thick or gummy means too much cornstarch or an over-reduced sauce — whisk in warm cider a spoonful at a time until it relaxes.
Yes — once it has cooled completely. Fill your crust, top it, and bake as your pie recipe directs, knowing the apples are already tender: most pies need about 10 to 15 minutes less than a raw-apple version, so go by the crust’s color and bubbling sauce rather than the clock. The cooled, pre-cooked filling is also exactly how you avoid the dreaded gap between the top crust and shrunken raw apples.
Not this recipe, and I would rather tell you that plainly than have you risk it. Home canning guides do not recommend cornstarch as the thickener for canned pie filling; tested recipes use a product called ClearJel and very specific processing times. This batch freezes beautifully for up to 3 months, which covers almost every pie emergency.
One of three things: the slices were cut too thin (paper-thin shreds cannot survive simmering), the apples cooked too long, or the variety was too soft to begin with. Slice a full 1/4 inch, simmer only until a fork meets slight resistance, and choose firm apples. And remember — for a topping rather than a pie, mushy is not a disaster; it is applesauce’s delicious cousin, and it still loves ice cream.
Easy Apple Pie Filling Recipe
Course: DessertCuisine: AmericanDifficulty: Easy5
cups (fills one 9-inch pie)20
minutes10
minutes30
minutesThin, even apple slices — half tart, half sweet — simmered with butter, brown sugar, and cinnamon in a thick, glossy amber sauce that sets sliceable. Enough for one 9-inch pie, and wonderful over ice cream, crisps, and pancakes.
Ingredients
6 medium apples (about 2½ lbs/1.1 kg), peeled, cored, sliced ¼ inch thick
1 tbsp lemon juice
4 tbsp (55 g) unsalted butter
½ cup (100 g) granulated sugar
½ cup (110 g) packed light brown sugar
1½ tsp ground cinnamon
¼ tsp ground nutmeg
¼ tsp fine salt
¾ cup (180 ml) water or apple cider, divided
3 tbsp cornstarch
1 tsp vanilla extract
Directions
- Peel, core and slice the apples an even ¼ inch thick; toss with the lemon juice.
- Melt butter in a large skillet; add apples, both sugars, cinnamon, nutmeg, salt and ½ cup water or cider; toss to coat.
- Cover and simmer on medium-low 8–10 minutes until just tender, still holding their shape.
- Whisk the cornstarch with the remaining ¼ cup cold water or cider until smooth.
- Stir the slurry in; cook 1–2 minutes until the sauce bubbles, turns clear and glossy.
- Off the heat, stir in the vanilla; taste and adjust.
- Spread in a shallow dish and cool completely, about 30 minutes, before using.
Notes
- Slice the apples an even 1/4 inch so they cook at the same rate, and pull them while they still hold their shape — they bake again inside the pie. The sauce thickens further as the filling cools. Always cool the filling completely before adding it to a raw crust, or the bottom will go soggy. This is a fridge/freezer filling, not a canning recipe.
Save this recipe for apple season — one 30-minute batch and you are a pie, a crisp, and a very good ice cream sundae ahead of the week.
More recipes you’ll love: Apple Pie, Blueberry Pie and Pie Crust.