
Easy Sourdough Bread Recipe
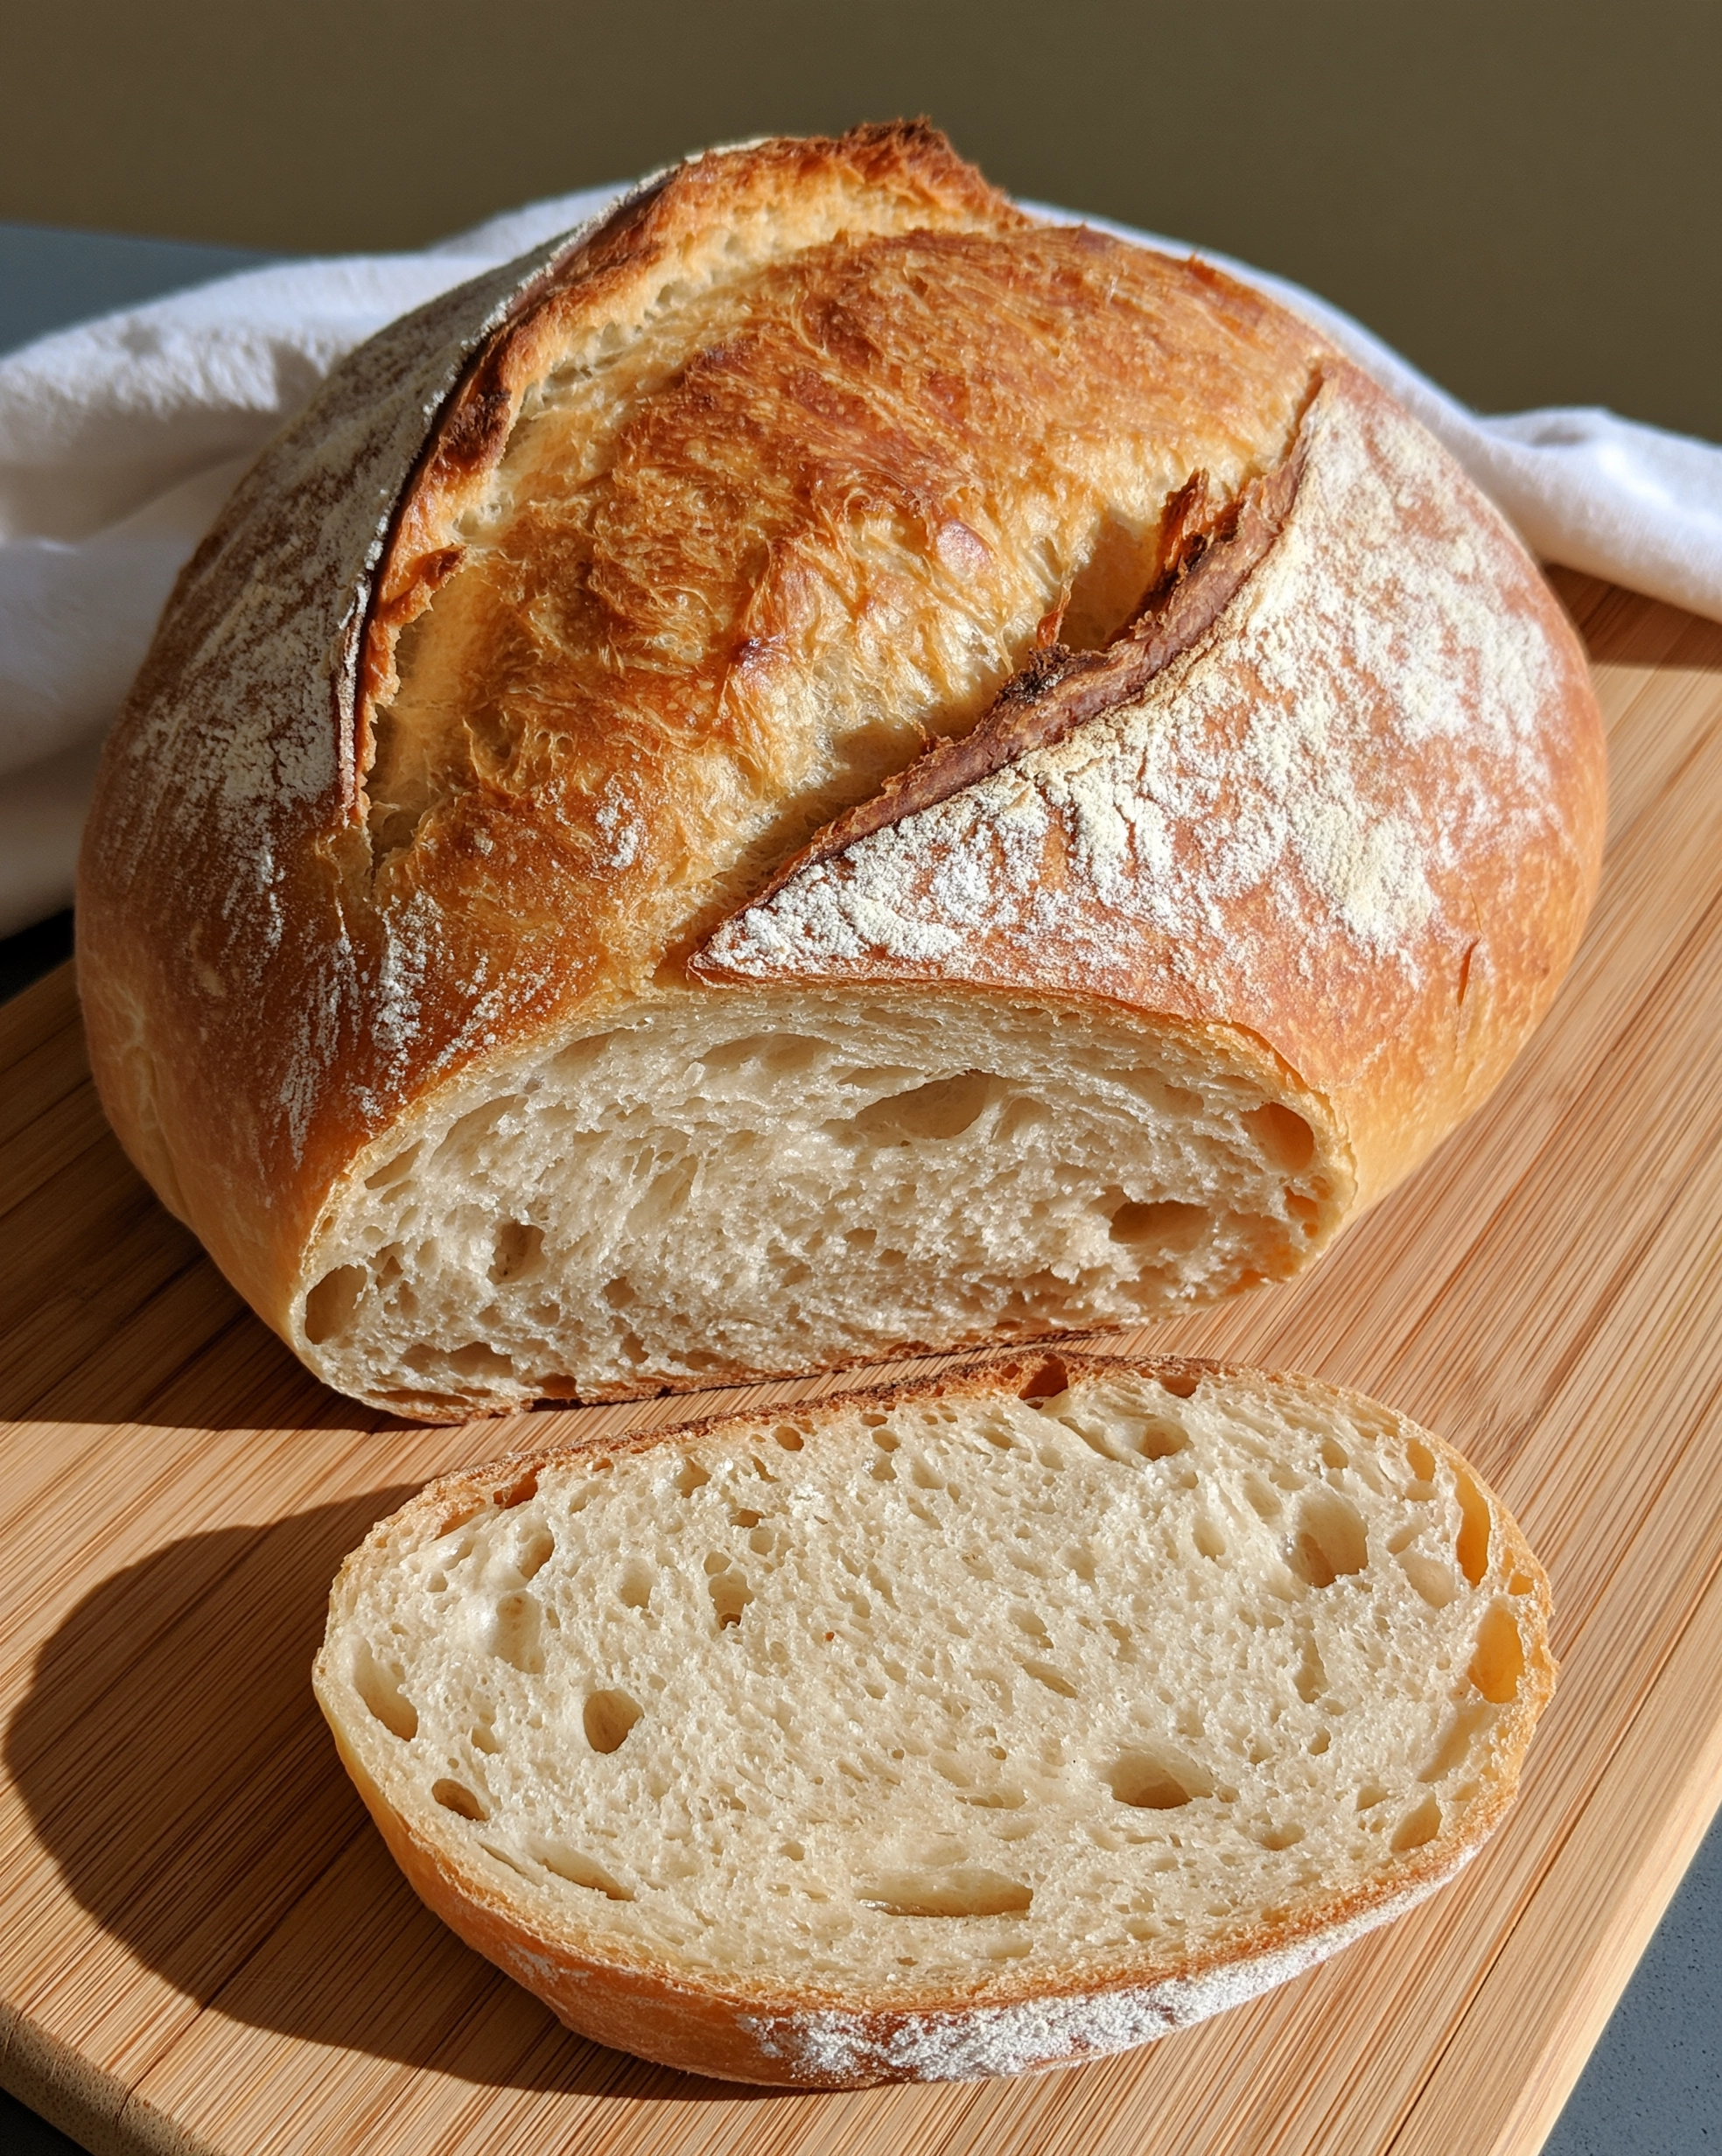
A crackly golden crust. A soft, open crumb full of little holes. And that one proud “ear” that lifts and crisps along the top of the loaf. This easy sourdough bread recipe gives you all of it — the exact round, rustic loaf in the photo — with just 4 ingredients and no kneading at all.
Now let us be honest, because most recipes are not: sourdough is not a 30-minute bread. From feeding your starter to slicing the loaf, this takes about 24 hours. But here is the secret — your hands-on work is only about 30 minutes total. The rest of the time, your starter is quietly doing the work for you while you get on with your day (and your sleep). Feed in the morning, mix at midday, shape in the evening, bake the next morning. That is the whole rhythm, and this recipe walks you through every stage.

Why This Sourdough Loaf Is Worth Every Hour
- Bakery looks, home kitchen — a deep golden, crackly crust, a light dusting of flour, and that classic scored “ear,” baked in a simple Dutch oven.
- Only 4 ingredients — flour, water, starter, and salt. No yeast packets, no sugar, no milk, nothing fancy hiding in the list.
- No kneading, no mixer — a few gentle stretch and folds build all the strength this dough needs.
- Mostly hands-off — roughly 30 minutes of real work, spread out in small, calm steps.
- A schedule that fits your life — the overnight cold proof does the flavor work while the loaf waits patiently in the fridge until you are ready to bake.
The Ingredients (Just 4 — Plus One Honest Note About Your Starter)
- 100 g active sourdough starter (about 1/2 cup) — fed 6 to 8 hours before mixing, doubled in size, and full of bubbles. This is the engine of the whole loaf, so it must be strong and happy, not sleepy straight from the fridge.
- 350 g warm water (about 1 1/2 cups) — warm to the touch, around 80°F (27°C). Hot water can harm your starter, so think bathwater, not tea.
- 500 g bread flour (about 4 cups), plus a little extra for dusting — bread flour’s higher protein gives you that chewy, open crumb. Weighing it really matters here (see the tips below).
- 10 g fine sea salt (about 1 3/4 teaspoons) — salt is not just flavor; it also keeps the fermentation calm and steady.
- Rice flour, for dusting the proofing basket (optional, but best) — it stops the dough from sticking and gives the crust that pretty white dusting you see in the photo. Regular flour works if that is what you have.
How to Make It: From Sleepy Starter to Crackly Loaf
A simple schedule to picture it: Day 1 morning — feed your starter. Day 1 midday — mix the dough and do the stretch and folds through the afternoon. Day 1 evening — shape the loaf and tuck it into the fridge. Day 2 morning — score, bake, cool, and slice.
- Feed your starter. About 6 to 8 hours before you plan to mix (the morning of Day 1 works perfectly), feed your starter with equal parts flour and water and leave it at room temperature. It is ready when it has doubled, the top looks slightly domed, and the sides are full of bubbles. Quick check — the float test: drop a small spoonful into a glass of water. If it floats, it is full of gas and ready to raise your loaf.
- Mix the dough. In a large bowl, whisk the active starter into the warm water until the water looks milky. Add the bread flour and mix with a spoon or a damp hand until you have a shaggy dough with no dry flour left. Cover and rest for 30 minutes. This little rest lets the flour drink up the water and makes everything easier from here.
- Add the salt. Sprinkle the salt over the dough with a teaspoon of water. Pinch the dough between your fingers and fold it over itself a few times until the salt disappears into the dough, about 1 to 2 minutes. The dough will feel smoother already. Cover and rest 30 minutes.
- Stretch and fold — this is your “kneading.” With a wet hand (wet hands stop the sticking), reach down one side of the bowl, pull the dough up tall, and fold it over the center. Turn the bowl a quarter turn and repeat until you have folded all four sides. That is one set. Do 4 sets, spaced 30 minutes apart — about 2 hours total. Watch the change: shaggy and rough at first, then smooth, stretchy, and strong.
- Let bulk fermentation finish. After the last set, cover the bowl and leave the dough at room temperature until it has risen about 50 to 75% (not fully doubled), the surface looks slightly domed with bubbles, and the whole bowl jiggles softly when you nudge it. This usually takes 2 to 4 more hours — 4 to 6 hours total since mixing. A warm kitchen moves faster, a cool one slower, so trust the dough, not the clock. Waiting for a full double often over-proofs the dough, and over-proofed dough bakes up flat.
- Shape your round boule. Tip the dough onto a lightly floured counter. Fold the edges into the center all the way around, like tucking in a letter, then flip it over so the seam faces down. Cup your hands around the ball and gently drag and rotate it toward you a few times. The surface should pull tight and smooth into a round ball — this is the exact shape of the loaf in the photo.
- Cold proof overnight. Dust a banneton — or a medium bowl lined with a clean tea towel — generously with rice flour. Place the dough inside seam-side up, cover, and refrigerate for 12 to 16 hours. This slow, cold rest builds the gentle tangy flavor and firms the dough up so it scores beautifully tomorrow.
- Preheat the oven and the Dutch oven. On Day 2, put your Dutch oven with its lid on into the oven and preheat to 450°F (230°C) for a full 45 to 60 minutes. That blazing-hot pot is what gives you the crackly crust and the big oven spring.
- Score for that beautiful “ear.” Turn the cold dough straight from the fridge onto a sheet of parchment paper, seam-side down. Dust the top lightly with flour. With a sharp blade, a bread lame, or a very sharp knife, make ONE confident slash, about 1/2 inch (1 cm) deep, slightly off-center, holding the blade at a shallow angle and moving in one smooth, gentle curve — exactly like the single score on the loaf in the photo. That angled cut is what opens up into the crisp, golden ear.
- Bake: lid on, then lid off. Using the parchment as a sling, lower the dough into the hot Dutch oven (careful — it is very hot). Bake with the lid ON for 20 minutes; the trapped steam keeps the crust soft long enough for the loaf to rise tall and the ear to lift. Then remove the lid and bake 20 to 25 minutes more, until the crust is a deep, rich golden brown like the photo. The inside should read 205–210°F (96–99°C) on a thermometer if you check.
- Cool before you slice — really. Move the loaf to a wire rack and wait at least 2 hours. The crumb is still setting inside, and slicing too early makes it gummy, no matter how good it smells. When you finally cut in, you should see that soft, open crumb with lovely holes — the slice moment is your reward.
Sofia’s Expert Tips (the Small Things That Change Everything)
- Pass the float test before you mix. A starter that has doubled, looks domed and bubbly, and floats a spoonful in water will raise a tall loaf. A weak, hungry starter is the number one reason first loaves come out flat — if yours is sluggish, give it two feeds a day for a couple of days first.
- Use a kitchen scale, every time. Sourdough runs on ratios. A heaped cup of flour can be off by 30 grams or more, and that is the difference between a workable dough and a sticky puddle. Grams take the guessing out completely.
- Watch the dough, not the clock. Fermentation speeds up and slows down with your kitchen’s temperature. Learn the signs — 50 to 75% rise, a domed top, bubbles, a soft jiggle — and your loaves will be consistent in every season.
- Wet hands are your best tool. This dough is meant to be soft and a little sticky. A bowl of water beside you for dipping your fingers makes stretch and folds and shaping calm instead of frustrating — no extra flour needed.
- Score cold, score once, score with confidence. Cold dough from the fridge cuts clean instead of dragging. One smooth slash at a shallow angle gives you the ear; sawing back and forth or cutting straight down gives you a flat scar instead.
- Dark golden means done — pale means wait. Beginners often pull the loaf too early. That deep color in the photo is pure flavor. Trust the full lid-off time, and let the crust sing and crackle as it cools.
Easy Variations to Try
- Hearty whole wheat: swap 100 g of the bread flour for whole wheat flour and add 1 extra tablespoon of water. The loaf will be a little denser, with a warm, nutty flavor.
- Seeded crunch: fold 1/3 cup of sunflower or pumpkin seeds into the dough at the second stretch and fold, or roll the shaped loaf in seeds or rolled oats before its cold proof.
- Garlic and rosemary: fold 1 teaspoon of finely chopped fresh rosemary and 2 to 3 cloves of roasted, mashed garlic into the dough during the first stretch and fold. Incredible with soup.
- Cinnamon raisin (the sweet breakfast loaf): at shaping time, flatten the dough gently, sprinkle over 2 teaspoons of cinnamon and 3/4 cup of raisins, then fold and shape as usual. Toasted with butter, it tastes like a bakery treat.
How to Store It (and Bring Back That Crunch)
- Room temperature: keep the loaf cut-side down on a wooden board, or in a cloth or paper bag, for 2 to 3 days. Avoid sealed plastic — it softens the crust you worked so hard for.
- Never the fridge: refrigerating bread makes it go stale faster than leaving it out. The counter or the freezer are the only two good homes for this loaf.
- Freezer: slice the whole loaf first, stack the slices with small pieces of parchment between them, and freeze in a sealed bag for up to 3 months. Toast slices straight from frozen.
- Reheat and revive: to refresh a whole or half loaf, sprinkle the crust lightly with water and warm it at 350°F (175°C) for 10 to 15 minutes. The crust turns crisp again, almost like fresh-baked.
Frequently Asked Questions
It should double in size within 4 to 8 hours of a feeding, look domed and bubbly on top, and smell pleasantly tangy, a little like yogurt or green apples. The float test confirms it: a small spoonful dropped in water should float. If it sinks and looks thin, feed it again and wait.
You still have good options. Any heavy, oven-safe pot with a tight lid (cast iron, enamel, or stainless steel) works the same way. No lidded pot? Bake the loaf on a preheated baking sheet or pizza stone and cover it with a large metal bowl for the first 20 minutes, or place a pan of hot water on the rack below for steam. The crust may be a touch less crisp, but the bread will still be delicious.
That stickiness is normal — this is a soft dough, and it is exactly what gives you the open, airy crumb. Resist adding a lot of extra flour, which makes the loaf heavy. Use wet hands and a bench scraper instead, and you will notice the dough turning smoother and easier after every set of stretch and folds.
The usual suspects are a starter that was not strong enough, or dough that fermented too long or not long enough. Make sure your starter passes the float test, end bulk fermentation at a 50 to 75% rise rather than a full double, and build a tight surface when you shape — that tension is what holds the round shape in the oven.
Yes, your loaf will still work. Expect a slightly softer crumb and a little less height, because all-purpose flour has less protein. Since it also absorbs less water, hold back about 2 tablespoons (25 g) of the water at mixing time; you can drizzle it in later if the dough feels too stiff.

Easy Sourdough Bread Recipe
Course: Breakfasts4
servings30
minutes40
minutes300
kcalIngredients
Directions
Save this recipe before your next bake day — once that first crackly, golden loaf comes out of your own oven, plain store-bought bread will never taste the same again.
More recipes you’ll love: Easy Bread for Beginners Recipe, Easy Focaccia Bread Recipe and Easy Sourdough Pumpkin Muffins Recipe.



One Comment